pre-commit vs. CI
There is one question I get asked when people sit down to automate some checks in their project for the first time:
Should I use pre-commit? Or should I set up a continuous integration in my GitLab/GitHub repository?
The answer is "yes". You should use one or the other. Or even both. Whichever solution you choose, that's already an improvement for your project. Code formatting, running tests, or linting should happen automatically without you needing to remember to run them all the time.
Setting up a CI pipeline is a great way to automate those repetitive tasks and ensure consistency in your project (i.e., to make sure that every developer formats the code in the same way, runs the same static analysis tools, etc.). But it's also an additional layer of complexity. CI pipelines run on an external server, so debugging CI-related issues is always harder than debugging something on your computer.
You can run pre-commit in many different ways, both locally on your computer and on a server. Some people run it as part of their CI pipeline, which is also an interesting way to orchestrate multiple checks with one easily managed configuration file. But in this article, I focus on answering the question of whether it's enough to run pre-commit locally on your computer or if you should set up a CI configuration for your project.
Conveniently, CI runs checks in the background - you push your code to the repository and move on to work on the next feature. And if something breaks, you get a notification. But if you work on a small- to medium-size project and don't go crazy with the number of checks and linters in your configuration, pre-commit will probably run in a split of a second (except for tests - they usually take much longer, but I will talk about them in a moment). Most of the time, it will be so fast that the waiting time won't bother you. And the nearly immediate feedback from linters will make it much easier to fix those violations right away.
When a CI pipeline fails, you are probably already working on a different feature in a different branch. To fix the failing pipeline, you have to switch back to the old branch (and also switch the context in your head to what you were working on before), fix the issue, and push it back. That is much more inconvenient than a short wait time of pre-commit.
Look, I hate waiting for things to happen on my computer. But having to choose between waiting 1-2 seconds for pre-commit to run each time I create a new commit and going back to my old code to fix some really silly mistake, I choose the waiting.
But what if the waiting takes longer?
Tests
Not every check runs instantly. Let's talk about the elephant in the pipeline - tests. Tests are usually the slowest part of your CI or pre-commit setup. That slowness is one of the reasons why pre-commit never added an official hook to run pytest (this and the technical complexity of this hook are the two main reasons). One way to deal with this problem is not to write tests. But how about some actually useful solutions that don't involve crippling your project by removing one of the most important feedback you can get about your code?[1]
There are a couple of options.
Running tests in a CI
The first idea is to run tests in a CI. But to keep your CI simple and easy to manage, you only run tests in the CI and all the other checks run in pre-commit. This can be as easy to set up as typing "run pytest in GitLab CI" (or "in GitHub actions") in your favorite search engine and applying the results that you get.
For GitLab CI, such a simple pipeline might look like this:
# .gitlab-ci.yml

image: python:3.11

run_tests:
  script:
    - pip install pytest
    - pytest
The configuration for GitHub actions might look like the following file. This one is a bit more complex as I patched it together from the python-package.yaml and other official Python templates in GitHub's documentation. You could skip the part that upgrades pip (but it's a good practice to do it) or installs dependencies from the requirements.txt file (but I wanted to show you how to do this in case you have a requirements.txt file) to simplify the configuration if needed.
# .github/workflows/run_tests.yml

name: Run tests

on: [push]

jobs:
  build:
    runs-on: ubuntu-latest
	steps:
    - uses: actions/checkout@v3
    - name: Set up Python 3.11
      uses: actions/setup-python@v3
      with:
        python-version: "3.11"
    - name: Install dependencies
    - run: |
        # Upgrade pip to the latest version - that's always a good idea
        python -m pip install --upgrade pip
        # Install pytest
        pip install pytest
        # Install requirements from requirements.txt file (if this file exist)
        if [ -f requirements.txt ]; then pip install -r requirements.txt; fi
    - name: Run pytest
      run: |
        pytest
Using such a simple configuration makes the most sense if you prefer to run most of your checks in pre-commit and don't want to maintain a complex CI. If you don't mind having some checks in pre-commit but also adding more tools to the CI, I would recommend making the split according to the "everything that takes milliseconds to finish runs in pre-commit and everything that is slower runs in the CI" rule. Or run the fast checks in pre-commit and all the slow and fast checks (including those from pre-commit) in the CI. That way, you don't have to worry that pre-commit on your computer might work differently than in the CI. The possibilities of mixing and matching different setups are endless.
What if you really want to avoid the CI at all costs, and at the same time, you don't want to wait for dozens of seconds (or minutes) each time you try to create a new commit because tests are still running? I have some potential solutions for this too.
post-commit hooks
The pre-commit tool is built on top of git's "hooks", and if you look at the documentation (or inside the .git/hooks/ folder of any git project on your computer), you will see that there are more hooks that you can use. For example, there are pre-rebase, pre-receive, pre-push, post-update, post-checkout, and the one that interests us the most: post-commit. The post-commit hook is executed after you create a commit. So instead of blocking the creation of a commit, we can create a commit, let some checks run in the terminal, but at the same time move on to working on the next task.
Luckily, we don't have to write those git hooks by hand, since pre-commit also supports other git hooks out of the box, including the post-commit one. Let's write a simple configuration file that runs the most common linters as a pre-commit hook and pytest as a post-commit hook:
# .pre-commit-config.yaml

default_language_version:
  python: python3.11

# Install pre-commit and post-commit hooks
default_install_hook_types: [pre-commit, post-commit]

repos:
  # Some standard hooks that come with pre-commit
  - repo: https://github.com/pre-commit/pre-commit-hooks
    rev: v4.4.0
    hooks:
      - id: check-yaml
      - id: end-of-file-fixer
      - id: trailing-whitespace
      # ...and other hooks
  # Lint the code with ruff
  - repo: https://github.com/charliermarsh/ruff-pre-commit
    rev: v0.0.290
    hooks:
      - id: ruff
        alias: autoformat
  # Run pytest (source: https://github.com/pre-commit/pre-commit/issues/761
  - repo: local
    hooks:
      - id: pytest
        name: pytest
        stages: [post-commit]
        entry: venv/bin/pytest
        language: script
        pass_filenames: false
        # alternatively you could `types: [python]` so it only runs when python files change
        # though tests might be invalidated if you were to say change a data file
        always_run: true
We will need to run some setup commands to make this work:
-
First, run
pre-commit installto install the pre-commit and post-commit hooks. Thanks to thedefault_install_hook_typessetting, we don't have to explicitly specify which hooks we want to install (by default, the pre-commit tool only installs pre-commit hooks). -
Then, create a new virtual environment and install pytest there:
python -m venv venv
source ./venv/bin/activate
pip install pytest
Now, our post-commit hook is ready. As you may have already noticed, the above setup does come with some caveats:
- The pre-commit tool does not manage the virtual environment for us. So it's our responsibility to set up a virtual environment and install pytest and all the other dependencies there. We also need to keep it up to date when the dependencies change.
- Unlike a pre-commit hook, a post-commit hook doesn't know which files were changed in the commit, so we need to use the
always_run: trueoption to make sure it runs every time. This also means that if we, for example, fix a typo in a README file, the whole test suite will run. We could change that behavior by passingtypes: [python], as suggested in a comment in the above code. But what if, let's say, you want to run your tests each time you modify one of the CSV files used in test cases? You need to decide whether you want to enable thetypesfilter or not. - Running tests still takes time; it's just that now they run after you created the commit. And depending on your workflow, that might solve all your problems. You create a commit, and then tests start running, but you switch back to the code editor and start working on a new feature, so you're no longer blocked waiting for tests to finish running. However, if your workflow is different (e.g., you want to push your code to the repository and create a new merge/pull request), we didn't really solve anything. You're still blocked until tests finish running (unless you push your code from another terminal tab, but then you don't know if your latest commit broke tests or not).
The most important difference between a pre-commit and a post-commit hook is that, since the latter runs after we have already created the commit, a failing test won't retroactively invalidate that last commit. The post-commit hook should mainly be used for notifying the user about something, not running important checks, so we're abusing it a bit here. This also means that we're now making the user responsible for ensuring that code with failing tests is not pushed to the repository. If we don't notice that the tests are failing, we will push potentially broken code to the upstream repository and pre-commit can no longer stop us.
Running pytest in the background
I want to show you one more way of running tests that solves the "blocking wait time" problem that git hooks have. This is something I picked from working with the JavaScript ecosystem, where it's common to have some scripts watch for changes in a given repository. When one of the files changes, such a script will recompile some other files, restart the server, or rebuild assets.
I use it, for example, when writing articles on this blog. When I drop a new image in a specific folder, 11ty will trigger a script to generate different image formats and sizes and copy them to the folder with all static assets. We can do the same thing for our tests - run them in the background each time one of the Python files changes.
With pytest-watch, we can monitor a specific folder, run tests, and, if they are failing, display a popup or make some beeping sound. Simply install pytest-watch and run it in a folder of your project:
pip install pytest-watch
ptw
Now, each time you change any files in your project, pytest-watch will rerun tests and notify you when they start failing.
Some other features of pytest-watch worth noting are:
- You can configure it through the
pytest.inifile, so you can share the configuration with your team. - With the
--spooloption, you can add a delay between running tests in case you don't want to be constantly bombarded with notifications about failures if you're doing some heavy refactoring. --nobeepdisables the beeping sound.
pytest-xdist - one of the most popular pytest plugins that allows you to run tests in parallel - also has a similar feature called --looponfail that keeps rerunning your tests in a subprocess. However, this feature has been deprecated with a plan to reimplement it in the future, but without a concrete date. So, for the time being, I would stick with using pytest-watch.
Feedback in your code editor
No matter what tools you use to detect potential problems with your code, the longer the delay between writing the code and getting feedback, the harder and more annoying it is to fix it. An error about a misspelled variable or a missing import reported by pre-commit is much faster to fix because you get it when you're creating a commit. Feedback from the CI usually comes when you're already in a different code branch.
But an even faster way to fix a problem is when you get an error notification while writing the code. Your first line of defense against linter violations and badly formatted code is configuring your editor to use the same linters and formatters as your pre-commit or your CI do. Settings like "format code on save" are really a "set and forget" thing that, once configured, should work with zero effort from your side. So it's hard to justify not enabling that.
"My colleagues don't use pre-commit"
A CI server solves the problem of working with someone who doesn't know how or doesn't want to configure pre-commit or any other tools on their computer. Hopefully, those who "can't be bothered to install a linter" can be convinced otherwise by a short conversation with their team leader. But for some people, especially those not very tech-savvy or working on a company laptop that doesn't allow you to install anything that was not blessed by a very strict system administrator (which is often equivalent to "can't install anything at all"), it might be a problem to set up pre-commit. And even if they do, sometimes the configuration/versions of packages can mysteriously diverge between team members. No one wants to waste time fixing versions of some linters when they just want to finish writing their code and go home.
That's why you sometimes can't avoid using a CI server. You must ask yourself what will cause more frustration and cost you more time - making sure everyone in your projects installs and uses pre-commit or setting up and maintaining a CI server (and maybe paying some money for the build minutes). Quite often, a project started by a small team can use pre-commit at the beginning, but at some point, as the project and team grow in size, it's time to introduce a proper continuous integration solution.
Combining it all together
Let me close this article with a three-step recommendation from my Python CI for Beginners presentation.
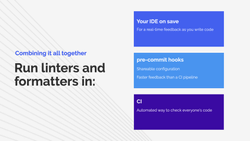
Configuring a code formatter or enabling options like "sort imports on save" in your IDE is usually a one-off operation that, once done, should just work. And installing plugins for linters will give you instant feedback so you can fix violations when writing the code. Once you spend some time configuring your code editor properly, it should drastically cut the number of issues you have to fix during the code reviews or after running your code through pre-commit/CI.
Configuring all the necessary checks in your code editor can work fine when you work alone. But different people in your team might be using different editors. And even if you all use the same one, sharing your settings and plugins' configuration is not always possible. On the other hand, sharing a pre-commit configuration is very easy - you just drop the .pre-commit-config.yaml file in the root of your folder. That's why pre-commit is a great way to make sure the same checks are running for everyone. It will also give you feedback much faster than a CI pipeline.
Unfortunately, pre-commit also has some limitations. It's unsuitable for running slow tasks (slower than a second or two), as it blocks you from creating a new commit until all checks are done. No one wants to wait a few minutes each time they create a new commit. And while it's easier to share a pre-commit configuration between all team members, you still rely on their "good will" to install and use this tool. For a particularly large/stubborn team, making sure everyone is running all the necessary checks can become more time-consuming than maintaining a CI server.
That's why, for projects where you need to collaborate with others, I recommend also using a continuous integration, even if you have plugins in your code editor and use pre-commit. Setting up a simple pipeline and adding more tools as your project grows is easy. CI will make sure the exact same checks run on everyone's code and will let you focus on important parts during code reviews (by automatically pointing out all those silly mistakes like unused variables or wrongly formatted code). You can also use CI to automate boring, repetitive tasks like building and publishing Docker images of your package or documentation pages.
If you want to learn more about continuous integration, check out my Beginner's Guide to Continuous Integration in Python article.
Angry comments from people who don't write tests incoming in 3..2..1.. Look, I also don't write tests for all my projects, but I won't deny their usefulness. ↩︎