Configuring Git
Git is a pretty amazing tool. It doesn't force you to use it in a particular way. If you want to start with a simple workflow, where you write some code and add it to the master branch - that's fine. You learn a handful of commands: commit, checkout, push, pull, status, and diff, and you're ready to go. Later, you may decide to start collaborating with someone on the code, so you introduce the concept of branches and pull requests. Then a day comes when you release the first official version of your software on GitHub, so you learn about tags. The more you use git, the more advanced topics you discover: blaming, bisecting, rewriting history (a.k.a. "how to make your colleagues hate you"), reflog, submodules, hooks and more.
One of the first things that you will encounter as you begin to delve deeper into git is the .gitconfig file - the configuration file of git. Before you can create your first commit, git will ask you to configure your name and email. It will even show you how to do this:
  git config --global user.email "[email protected]"
  git config --global user.name "Your Name"
Once you run those two commands, they will end up in the .gitconfig file in your home directory.
As with every tool, it's worth spending some time to figure out how you can configure it. You will learn about some features that you probably didn't know existed, and you will be able to configure that tool to work in a way you like the most.
So, let's take a look at what you might find in a .gitconfig file. And if you like something, feel free to copy the code (you can find my .gitconfig file here).
[alias]
Aliases are probably the biggest part of .gitconfig. On your journey to mastering git, you will be adding more and more of them. Git aliases are exactly what they sound - they let you call a specific function through a different name. It's quite a common practice to alias many of git's commands to a 1- or 2-letter shortcut, for example:
[alias]
    amend = commit --amend
    amendf = commit --amend --no-edit
    br = branch
    ci = commit
    co = checkout
    cp = cherry-pick
    d = diff
    ds = diff --staged
    l = log
    lg = log --graph --all --format=format:'%C(bold blue)%h%C(reset) - %C(bold green)(%ar)%C(reset) %C(white)%s%C(reset) %C(bold white)— %an%C(reset)%C(bold yellow)%d%C(reset)' --abbrev-commit --date=relative
    lp = log --pretty=oneline
    sa = stash apply
    sh = show
    ss = stash save
    st = status
I like to keep my aliases sorted alphabetically. Otherwise, I've noticed that I was creating duplicates all over the file. Also, no, I did not write the formula for lg myself ;). I copy-pasted it from somewhere, but you should check it out - it gives you a nice, concise graph of how the repository has evolved over time.
[color]
[color]
    ui = auto

[color "branch"]
    current = yellow reverse
    local = yellow
    remote = green

[color "status"]
    added = yellow
    changed = green
    untracked = cyan

[color "diff"]
    meta = yellow
    frag = magenta bold
    commit = yellow bold
    old = red bold
    new = green bold
    whitespace = red reverse

[color "diff-highlight"]
    oldNormal = red bold
    oldHighlight = red bold 52
    newNormal = green bold
    newHighlight = green bold 22
The ui = auto is the default setting for the UI - it colors the output when it's going straight to a terminal, but omits the color-control codes when the output is redirected to a pipe or a file.
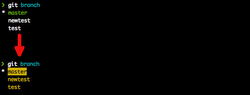
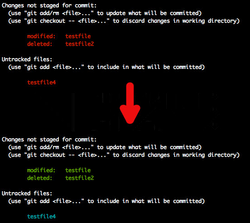
The branch and status sections are changing the output colors of git branch and git status commands in the following way:
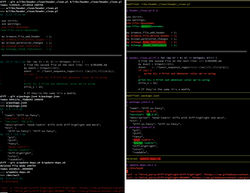
The diff and diff-highlight sets the colors that will be used in the git diff commands. For diff-ing, I'm using the diff-so-fancy tool. It's very easy to set up and gives a new look to the git diff output, so make sure to check it out. Here is a screenshot of how it looks:
[core]
[core]
    editor = vim
    excludesfile = ~/.gitignore
    pager = diff-so-fancy | less --tabs=4 -RFX
    # Configure Git on OS X to properly handle line endings
    # autocrlf = input
The core section contains various different settings related to git. Here are some that I am using:
editor = vimsets which editor you want to use for editing commit messages (if this value is not set, git will first try to read what editor you are using from the environment variablesVISUALorEDITORand if that fails, it will fall back tovi). I'm not using Vim for coding, but for quick edits like that, I prefer it over Sublime or VS Code.excludesfile = ~/.gitignorelets you specify the global.gitignorefile. Each git repository can contain a.gitignorefile that specifies which files you want to exclude from version control. Quite often though, some of those files will be the same for each git repository (for example, the.DS_Storeon macOS, or*.pycwhen you are a Python developer), so instead of writing them over and over again, it's better to create a global.gitignorefile.pager = diff-so-fancy | less --tabs=4 -RFXspecifies which tool you want to use to show the output ofgit log,git diffandgit showcommands. By default, git will useless. I'm using the diff-so-fancy.- UPDATE: As suggested by emn13 on reddit, using the
autocrlfsetting can corrupt your binary files - something that I wasn't aware of. I've decided to remove this setting from my.gitconfigfile.
autocrlf = input- since Windows is using different line endings than Unix and MacOS, if people from different operating systems are committing to the same repository, it can cause a bit of a mess. Since I'm working on MacOS, I'm setting this option toinput. Here is a great explanation how to set it depending on which operating system you are using (TLDR:autocrlf = inputon MacOS/Linux andautocrlf = trueon Windows)
[credential]
[credential]
    helper = cache --timeout=28800 # 8 hours
Some remote repositories that you will be working with are protected with passwords. The credential section of the configuration will specify how you want to store the credentials to those repositories. By default, git is not storing the credentials at all, so you will be prompted for the username and password each time you try to connect. If you want to store the credentials for further use, you can either save them in a file with the store option (it will create a plain-text file with your credentials) or store them in the memory using the cache option. There are additional options, depending on which operating system you are using (osxkeychain for MacOS or Git Credential Manager for Windows on Windows). I've decided to use the store in memory option. The default timeout for credentials is 15 minutes, but I've decided to increase it to 8 hours, so I type them once at the beginning of the day and when they expire, it's usually a sign that I should go home ;).
[push]
[push]
    default = current
Every now and then, I forget to include the name of the branch in the git push command and that can result in unexpected behavior (e.g. I'm working on a dev branch, but by accident, I'm pushing the master branch). This can be especially problematic if you are using git push --force from time to time, as I do. To prevent this kind of mistake, I'm setting the default = current option of the push command. Now, if I forget to include the name of the branch, git will try to push to the branch with the same name. If it can't find a branch with the same name in the remote repository, it will create one.
Conclusion
That was a long list, but if you apply at least some of those settings in your .gitconfig file, you will be surprised at how much nicer git looks and how much more efficient you will become when using it. If you are looking for more information, I have two suggestions:
- git-config documentation page that lists all the available settings.
- search for gitconfig dotfiles and you will find plenty of existing
.gitconfigfiles that other developers are using. The first item on that list - mathiasbynens/dotfiles is a repository with over 20,000 stars, so I'm sure you will find a lot of useful ideas.