Web Automation With n8n, Telegram, Online Forms, and a Bit of Python
I have a small side project where I sell subscriptions for two TradingView scripts. It brings me around $200 each month, and I described its story in a previous post. I built it in 2020, and since 2022, it has run in autopilot mode. The only maintenance on my end is answering emails from existing customers and manually revoking access for cancelled subscriptions, which takes 1-2 hours per month at maximum. But automating everything required patching together some Python web crawlers, Telegram API, and email clients as well as setting up n8n to orchestrate everything.
Here are the common tasks that I had to automate:
- The most critical part was automating the process of giving customers access to the scripts when they buy subscriptions through Gumroad. The world doesn't stop when I go to sleep, and sometimes people buy a subscription in the middle of my night. Most customers are patient and will wait for a few hours (as it's explained in the product's description). But every now and then, I have that one type of customer who will start spamming me with emails like "I still don't have access" after five minutes. I didn't want to drop whatever I was doing and rush to my computer to give someone access whenever I got an email about a new sale, so I had to automate this process. Gumroad offers a developer-friendly feature called "Ping", which sends a JSON request to a specific URL each time you make a sale. Unfortunately, TradingView has no official API to manage user access, and when I started this project in 2021, there weren't even any unofficial ones like this one. So, I needed a way to automate granting access to the users and sending them an email with confirmation and some useful instructions on how to use the script when they subscribed.
- There were even more access-related actions I wanted to simplify. When someone cancelled their subscription, I had to revoke their access from the day their subscription would expire (which could be immediate if the subscription was cancelled because of a failed payment or up to a year from now if they had a yearly subscription). When people asked for a free trial, I had to give them access for a week. All that would require me to log in to TradingView, navigate to the corresponding script and click through some selection fields to grant access to a given user. I could write a CLI script, but that would require me to use my computer, and sometimes, all I had with me was my phone. So, I've decided to write a Telegram bot that I could use to give or remove access since I had Telegram installed both on my phone and on my computer.
- For a long time, I was offering a free one-week trial for anyone leaving a comment under one of the paid scripts, meaning I had to check who left a comment and grant them access. This could also be automated - I could ask people to fill in an online form that would send a request to my CLI and automatically grant them seven-day access.
High-level overview
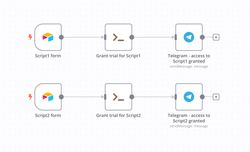
Here's a diagram of my setup:
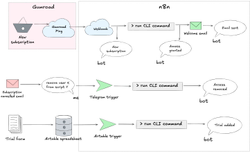
Let's break it down by explaining how I got from doing all the work manually to a semi-automated setup where new customers and people requesting a trial get access automatically, and any other permissions management can be done with a Telegram bot.
Python script
The first step was to automate the interactions with TradingView. There is no official API, so I needed a tool like Puppeteer, which can control a headless browser to automate clicking, typing, and any other website interaction needed to grant or revoke access to my TradingView scripts. I chose the pyppeteer package - an unofficial Python port of Puppeteer.
Below is the code I wrote to interact with the TradingView website and perform a couple of basic interactions:
- Checking if a given TradingView user has access to a specific script.
- Revoking existing access.
- Adding access for a new user. This access could have one of the following expiration dates:
- No expiration date - if the function was called without any additional parameter.
- Expire in seven days - if a parameter "t" (that stands for "trial") was given.
- Expire on a specific day - in case a numeric value was provided as the last parameter. For example, if I passed the value "20240615", the access would expire on 2024.06.15.
Warning - lots of ugly code incoming. But it works, so I never bothered refactoring it. You can also view the code on GitHub.
# api.py

import datetime
import logging
from typing import Optional

from .helpers import add_access_json, check_access_json, launch_browser, login, remove_access_json


async def add_access(script: str, user: str, trial: bool = False, date: Optional[str] = None):
    """Handle the logic for adding access to a script for a given user."""
    browser, page = await launch_browser()
    await login(page)

    resp = await check_access_json(page, script, user)
    if results := resp["results"]:
        if "expiration" not in results[0]:
            output = f"User '{user}' already has non-expiring access to script {script}!"
            await browser.close()
            logging.info(output)
            return output
        else:
            # Remove existing temporary access
            logging.info(f"User '{user}' has temporary access to script {script}")
            resp = await remove_access_json(page, script, user)
            if resp["status"] != "ok":
                error = f"Something went wrong when removing access to {script} from user {user}: {resp}"
                await browser.close()
                logging.info(error)
                return error
            logging.info("Temporary access REMOVED")

    if trial:
        end_date = datetime.date.today() + datetime.timedelta(days=8)
        expiration_str = f"{end_date.isoformat()}T23:59:59.999Z"
    elif date:
        try:
            end_date = datetime.datetime.strptime(date, "%Y%m%d").date()
        except ValueError:
            error = f"Invalid end date format: '{date}'! It should be like this: 20211231"
            await browser.close()
            logging.info(error)
            return error
        expiration_str = f"{end_date.isoformat()}T23:59:59.999Z"
    else:
        expiration_str = None

    resp = await add_access_json(page, script, user, expiration_str)
    if resp.get("status") == "ok":
        until = f"until {expiration_str}" if expiration_str else "non-expiring"
        output = f"Access to script {script} ADDED for user {user} [{until}]"
        await browser.close()
        logging.info(output)
        return output
    else:
        error = f"Something went wrong when adding access to {script} for user {user} [{expiration_str}]]: {resp}"
        await browser.close()
        logging.info(error)
        return error


async def check_access(script: str, user: str) -> str:
    """Check if a given user has access to a given script."""
    browser, page = await launch_browser()
    await login(page)

    resp = await check_access_json(page, script, user)
    results = resp["results"]

    output = ""
    if not results:
        output = f"User {user} DOESN'T HAVE access to script '{script}'"
    else:
        result = results[0]
        if result.get("username") == user:
            if "expiration" not in result:
                output = f"User {user} HAS non-expiring access to script '{script}'"
            else:
                expiration = result.get("expiration")
                output = f"User {user} HAS access until {expiration} to script '{script}'"

    await browser.close()
    logging.info(output)
    return output


async def remove_access(script: str, user: str) -> str:
    """Remove access from a given script for a given user."""
    browser, page = await launch_browser()
    await login(page)

    resp = await check_access_json(page, script, user)
    if not resp["results"]:
        output = f"User '{user}' ALREADY DOESN'T HAVE access to script {script}!"
        await browser.close()
        logging.info(output)
        return output

    resp = await remove_access_json(page, script, user)
    if resp["status"] == "ok":
        output = f"Access to script '{script}' REMOVED from user {user}"
        await browser.close()
        logging.info(output)
        return output
    else:
        error = f"Something went wrong when removing access to {script} from user {user}: {resp}"
        await browser.close()
        logging.info(error)
        return error
For completeness, here is the helpers.py module with various helper methods to log in or send POST requests with JSON payload:
# helpers.py

import asyncio
import os
from typing import Optional

from pyppeteer import launch
from pyppeteer.browser import Browser
from pyppeteer.page import Page

# I've removed my username and any other confidential information
MAIN_URL = "https://www.tradingview.com/u/<my-username>/"
LOGIN_URL = "https://www.tradingview.com/accounts/signin/"

USERNAME = os.environ["TV_USERNAME"]
PASSWORD = os.environ["TV_PASSWORD"]

# Indicator ID can be found in the POST requests that TradingView sends
# Use the "Network" tab of your browser's dev tools to find that ID
INDICATOR_IDS = {
    "Script1": "PUB;<alphanumeric ID1>",
    "Script2": "PUB;<alphanumeric ID2>",
}

API_URLS = {
    "add": "https://www.tradingview.com/pine_perm/add/",
    "check": "https://www.tradingview.com/pine_perm/list_users/",
    "remove": "https://www.tradingview.com/pine_perm/remove/",
}


async def post_request(page: Page, url: str, params: dict) -> dict:
    """Prepare and evaluate a JavaScript code with POST request in the context of the current page."""
    form = "let formData = new FormData();\n"
    for key, value in params.items():
        form += f"formData.append('{key}', '{value}');\n"
    payload = "() => {\n" + form
    payload += f'return fetch("{url}",'
    payload += '{"credentials": "include", "mode": "cors", "method": "POST", "body": formData}'
    payload += ").then(res => res.json());}"
    return await page.evaluate(payload)


async def launch_browser() -> tuple[Browser, Page]:
    """Open browser and set some default settings."""
    browser = await launch(
        executablePath="/usr/bin/chromium-browser",
        headless=True,
        args=["--no-sandbox", "--disable-gpu"],
    )
    page = await browser.newPage()
    # Set some legitimately looking user agent
    await page.setUserAgent("Mozilla/5.0 (Macintosh; Intel Mac OS X 14.5; rv:126.0) Gecko/20100101 Firefox/126.0")
    return (browser, page)


async def login(page: Page):
    # networkidle2: consider navigation to be done when there are no more than 2 network connections for at least 500 ms
    await page.goto(LOGIN_URL, {"waitUntil": "networkidle2"})

    await page.click('button[name="Email"]')
    await page.waitForSelector("input[name=id_username]")

    await page.type("input[name=id_username]", USERNAME)
    await page.type("input[name=id_password]", PASSWORD)
    submit_button = await page.xpath("//button[contains(., 'Sign in')]")
    await submit_button[0].click()
    await asyncio.sleep(3)
    await page.goto(MAIN_URL, {"waitUntil": "networkidle2"})


# Functions creating POST requests with JSON payload
async def add_access_json(page: Page, script: str, user: str, expiration_str: Optional[str] = None):
    """Add access to a script for a given user and return JSON response."""
    payload = {
        "pine_id": INDICATOR_IDS[script],
        "username_recip": user,
    }
    if expiration_str:
        payload["expiration"] = expiration_str
    return await post_request(page, API_URLS["add"], payload)


async def check_access_json(page: Page, script: str, user: str):
    """Check access to a script for a given user and return a JSON response."""
    payload = {
        "pine_id": INDICATOR_IDS[script],
        "username": user,
    }
    return await post_request(page, API_URLS["check"], payload)


async def remove_access_json(page: Page, script: str, user: str):
    """Remove access to a script from a given user and return JSON response."""
    payload = {
        "pine_id": INDICATOR_IDS[script],
        "username_recip": user,
    }
    return await post_request(page, API_URLS["remove"], payload)
Most of the code is related to parsing HTML or JSON responses - figuring out what text or HTML class needs to be present to confirm that the access was successfully granted, what's the input class that will distinguish the "registration" form from the "login" form, what's the response if the user already has access to a script vs. when they don't, etc. The craziest function is post_request, which sends a POST request with a JSON payload by executing the JavaScript code on the currently open page (but hey, it works, and it's easier than figuring out how to plug the requests module into this mix).
The most important thing to remember when writing code to parse HTML is to make it future-proof. Websites change all the time, so you need to find attributes that are less likely to change. Let's take an example from TradingView's login page. The input element for the email or username has a input-RUSovanF class, which seems to be automatically generated and will likely change in the future. However, the same input element has an "id" attribute equal to id_username. This attribute probably won't change. Or at least it hasn't changed in the last few years, so my script keeps working.😉
Don't rely on the order of the HTML elements either. Most browsers offer an option to "copy the XPath" in the developer tools. This will give you a cryptic string like /html/body/div[3]/form/div[1]/span[2], which can be used to uniquely identify a given HTML element on the page. The above XPath roughly translates to "it's a second span in the first div of the form element located in the third div of the body element". The problem with XPaths is that:
- They are hard to debug - most of them will be much longer than my simple example.
- It's extremely likely that the page's structure will change so that "second span in the first div" will point to something completely different. Or maybe parts of the XPath will no longer work because the
bodywill no longer have threedivs.
If possible, try to find id attributes or class names that look unique and are not automatically generated, and avoid long XPaths.
Adding a CLI to my Python script
To make it easier to interact with the script, I slapped Click on top of it to support a handful of commands. This would allow me to manage users' access with simple commands in the terminal.
Here's an example of a command to add access for a new user:
# cli.py
import asyncio

import click

from .api import add_access


@click.group()
def cli():
    pass


@click.command()
@click.argument("user")
@click.argument("script")
@click.argument("until", required=False)
def add(user, script, until):
    script_fullname = None
    if script == "1":
        script_fullname = "Script1"
    elif script == "2":
        script_fullname = "Script2"
    else:
        raise ValueError(f"Wrong script name {script}! Choose '1' or '2'")

    trial = False
    expiration = None
    if until:
        if until == "t":
            trial = True
        elif until.isnumeric():
            expiration = until

    result = asyncio.run(add_access(script_fullname, user, trial, expiration))
    click.echo(result)


if __name__ == "__main__":
    cli()
Now, I could run the following command in the terminal: $ python cli.py add UserName 1, and Click would call the add_access function from the api.py file. I no longer had to log in to TradingView and manually grant access each time I got an email about a new subscription or a request for a trial.
For new subscriptions, I could also use Gumroad's Ping and receive a POST request with all the information about the buyer and the purchase. All I had to do was to set up a web server that would accept that request and run my Python script. My initial idea was to set up a simple FastAPI website or something similar, but I knew that in the future, I would be connecting more services. I didn't want to write Python code each time I needed to add a new functionality, like sending an automated "welcome" email. There were better tools for this.
n8n server
I started looking at automation tools like Zapier, where I could connect various services together and make them talk to each other. In 2021, Zapier had a much lower limit on the number of automations you could run in the free tier, and I didn't feel like paying for the paid plan. Especially since there were free, self-hosted alternatives that I had been keen to try for a long time: n8n and huggin. I played with n8n for a bit and I was sold - nice UI, a fun way of building workflows with blocks (called "nodes"), and plenty of integrations to choose from. This and the fact that any questions that came to my mind were already answered on the forum made me choose n8n as the platform for my automation[1].
I bought a small VM, registered a cheap .top domain (that costs around $5/year) and followed instructions to install n8n on that droplet. And voilà, I had my private n8n instance running 24/7.
Now, how do I run my Python script in the n8n workflow? There was a node called Code node, but at that time, it only supported JavaScript. Luckily, on the forum, someone had already asked how to run Python code with n8n, and the suggestion was to extend the n8n Docker image and add Python there. This was a good idea, and I took it up a notch by installing additional Python libraries that I was planning to use (like pyppeteer or click) and adding my custom Python scripts to the Docker image.
My Dockerfile looked like this:
FROM n8nio/n8n

# Set timezone to Warsaw for more accurate logging
ENV TZ="Europe/Warsaw"

# Install python/pip
ENV PYTHONUNBUFFERED=1
RUN apk add --update --no-cache python3 && ln -sf python3 /usr/bin/python
RUN python3 -m ensurepip
RUN pip3 install --no-cache --upgrade pip setuptools

# Install chromium
RUN apk -U add chromium udev ttf-freefont

COPY requirements.txt .

# Install Python libraries
RUN python -m pip install -r requirements.txt

# Set environment variables
ENV TV_USERNAME=$TV_USERNAME
ENV TV_PASSWORD=$TV_PASSWORD

# Copy remaining files (cache busts here)
COPY . .

# ENDPOINT command will be used from the original n8n image
Then, I added a docker-compose file to run two services:
- A n8n instance using my custom docker image downloaded from a private Gitlab registry.
- A watchtower, which is a very cool tool that will restart the containers if there is a newer version of the image in the registry.
# docker-compose.yml
version: "3"

services:
  n8n:
    image: registry.gitlab.com/switowski/myproject
    restart: always
    ports:
      - '0.0.0.0:5678:5678'
    environment:
      - N8N_BASIC_AUTH_ACTIVE=true
      - N8N_BASIC_AUTH_USER
      - N8N_BASIC_AUTH_PASSWORD
      - TV_USERNAME
      - TV_PASSWORD
      - N8N_HOST=${SUBDOMAIN}.${DOMAIN_NAME}
      - N8N_PORT=5678
      - N8N_PROTOCOL=https
      - NODE_ENV=production
      - WEBHOOK_URL=https://${SUBDOMAIN}.${DOMAIN_NAME}/
      - GENERIC_TIMEZONE=${GENERIC_TIMEZONE}
    volumes:
      - ${DATA_FOLDER}:/home/node/.n8n
  watchtower:
    image: containrrr/watchtower
    volumes:
      - /var/run/docker.sock:/var/run/docker.sock
      - /root/.docker/config.json:/config.json
Finally, I used the following Gitlab CI configuration to automatically rebuild the Docker image in my CI pipeline:
# .gitlab-ci.yml
build:
  stage: build
  image:
    name: gcr.io/kaniko-project/executor:debug
    entrypoint: [""]
  script:
    - mkdir -p /kaniko/.docker
    - echo "{\"auths\":{\"${CI_REGISTRY}\":{\"auth\":\"$(printf "%s:%s" "${CI_REGISTRY_USER}" "${CI_REGISTRY_PASSWORD}" | base64 | tr -d '\n')\"}}}" > /kaniko/.docker/config.json
    - >-
      /kaniko/executor
      --context "${CI_PROJECT_DIR}"
      --dockerfile "${CI_PROJECT_DIR}/Dockerfile"
      --destination "${CI_REGISTRY_IMAGE}"
With the above setup, when I pushed updated code to the repository, CI would build and push a new Docker image to Gitlab's registry. Then, the watchtower running on my droplet would notice the change, pull it and restart the n8n service with the latest code. Sweet automation!
Once n8n was installed on my server, I could start creating workflows. But before we get to that, let's talk about Telegram bots because a bot was also an integral part of my setup.
A Telegram bot
Creating a Telegram bot[2] is simple. You can follow the official documentation or one of many tutorials, but the gist is that there is a bot for creating other bots. You start a chat with a bot called @BotFather, and from there, you can select a command to create a new bot. This will give you an API token to control your new bot. Use this token to create a new "Telegram API" in n8n credentials.
For reading messages that the bot receives, you only need the API key. But I also wanted my bot to send me messages whenever something interesting happened. For example, when a new customer bought a subscription, and my Python script gave them access, I wanted to receive a confirmation message that everything went well. That way, I knew I didn't have to log in to my computer and grant them access manually.
To make the bot talk to me, I needed a "Chat ID". This ID distinguishes my chat with the bot from any other chat that another Telegram user might have started with my bot (bots are public, so anyone could start messaging my bot).
So, first, I had to start a chat with my bot and then figure out the chat's ID. I followed these instructions and opened a specific URL in the browser that gave me JSON information about the chat, including the chat ID.
With an API token and a chat ID, I had all the information needed to exchange messages with my bot. I could finally start creating n8n workflows.
n8n workflows
Gumroad Ping → granting access → sending a welcome email
First, I created a workflow triggered by Gumroad Ping that would grant access to the TradingView script, write me a confirmation message on Telegram, and finally send a "Welcome" email to the customer with some instructions and additional resources related to the script they just bought.
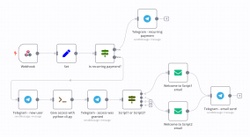
Here are the steps of the above workflow:
- The "Webhook" node receives a JSON POST request from Gumroad.
- The "Set" node grabs the important information from that request: the TradingView username (so I know who should have access), the script the user bought, and the user's email (so I know where to send the welcome email). Those three variables are set as global variables and used in the future steps of the workflow.
- The "Switch" node decides whether it's a recurring subscription that has been renewed for another month/year or a new subscription.
- For a renewal, I only send myself a Telegram message with a confirmation, and the workflow ends.
- If it is a new subscription, I first send myself a message saying, "Hey, you have a new customer!"
- Then, using the "Execute command" node, I run my Python script and grant access to the new customer.
- If that is successful, I send myself another Telegram message saying, "All good, access was granted". I set up the second message because it could happen that the Python script had an error, and my workflow would stop without telling me that something went wrong. So, with two Telegram messages (one saying I got a new customer and the other saying access was granted), I could check that the workflow proceeded as expected.
- Depending on which script the customer bought (determined using the "Switch" node), I send them one of two different emails using the "Send email" node. To set up this node, I had to provide credentials for my email account.
- The final step is to send myself another Telegram message - one confirming that the email was successfully sent. Again, this is to detect situations where sending an email would fail silently. If I didn't get this Telegram message, I knew that I had to log in to my email and send the welcome email manually.
Even though I was selling monthly and yearly subscriptions, in this workflow, I didn't check which subscription was bought. I always gave customers non-expiring access, and when they cancelled their subscription, I manually adjusted the expiration date. Not every access should be revoked the moment someone cancels their subscription. Sometimes, people cancelled in advance, so their access shouldn't expire for the next few days or weeks. And sometimes, their subscription was cancelled because their credit card expired, so they should lose access immediately.
Gumroad doesn't have the functionality to send a POST request when someone cancels a subscription, and parsing Gumroad emails to figure out when their subscription actually expires sounded too error-prone to automate. Instead, I decided to manually set the correct expiration date when I saw a cancellation email by sending a message to my bot. I would send one message to cancel a customer's current, non-expiring subscription, and right after that, I would send a second message to add access with a specific expiration date.
Manage customers' access from a Telegram bot
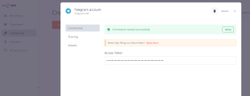
To manage permissions through a Telegram chat, I created another workflow:

It's an ultra-simple workflow. I send a Telegram message to my bot, and the message is pasted directly into the Python script. The output of the script is then pasted back to the Telegram chat. So, either I get a confirmation statement that all went well or a traceback of the error if something went wrong.
Here's what my typical conversations with the bot looks like:
Me: remove userA 1
Bot: Access to script Script1 REMOVED from user userA
...
Bot: New recurring payment from userB for Script2.
...
Bot: userC bought access to Script1
Bot: Access to script Script1 ADDED for user userC [non-expiring]
Bot: Email sent!
...
Me: check userD 1
Bot: User userD DOESN'T HAVE access to script Script1
Me: add userD 1 t
Bot: Access to script Script1 ADDED for user userD [until 2024-05-30T23:59:59.999Z]
Me: add userE 2 20240615
Bot: Access to script Script2 ADDED for user userE [until 2024-06-15T23:59:59.999Z]
The first version of the Python script was a beautiful CLI tool with named arguments and flags. All the fancy stuff that they teach in school to make your scripts user-friendly. I would write add user=SomeUser script=Script1 --trial to give someone access to a script or remove user=SomeUser script=Script2 to remove it.
After a few days of using my bot, I got tired of typing. For personal usage, brevity triumphs over clarity. I knew how to use the script, so I changed it to minimize the amount of typing I had to do. add user=SomeUser script=Script1 --trial became add SomeUser 1 t and remove user=SomeUser script=Script2 became remove SomeUser 1.
Online form
The last workflow I created was to automate granting trial access to the scripts. I started by signing up with Airtable and creating two simple online forms, each for one of the paid TradingView scripts. People could fill in their TradingView username and submit the form. With the "Airtable trigger" node in n8n, each submission would trigger the Python script to give the users trial access. Once the trial access was granted, I also got a confirmation message on Telegram.
And then the inevitable happened. People started gaming the system, requesting another trial access after the first expired. Cheaters! Well, I knew it was going to happen eventually.
Unfortunately, Airtable doesn't prevent duplicated submissions. At least not without using some expensive extensions. I wasn't going to pay $40/month to prevent users from requesting a trial multiple times. Luckily, I found another service that allows you to create forms and check that the answers are unique: Jotform. It even offers an integration with Airtable. I created a new form in Jotform with the uniqueness constraint. The username would then be copied to my Airtable spreadsheets, which in turn would trigger an n8n workflow and grant access to the user.
There is a simpler way!
When connecting Jotform to Airtable to prevent duplicated submissions, I didn't realize that n8n supports Jotform out of the box with a "Jotform node". I could skip Airtable and read data directly from Jotform instead. Well, I didn't do this, and now I have two services moving data from one to the other. But if you need to set up a form that doesn't accept duplicated submissions, I recommend using Jotform with n8n directly.
With those three automations in place, my work is now limited to answering support emails and occasionally removing access from customers who cancel their subscriptions. The total amount of time needed? Not more than one or two hours per month. With the Telegram app on my phone, I can quickly add or revoke access with a short message to my bot.
This setup is far from perfect. I'm sure many things can be improved. Instead of using the pyppeteer library, you may use playwright (which is actually the library that pyppeteer recommends using, as pyppeteer claims to no longer be maintained). You can use huginn instead of n8n if you prefer a more code-first approach to creating automated workflows instead of using a GUI like n8n. Pretty much any of the tools I used can be replaced with something more suitable. But this is a setup I came up with over the course of a weekend. It just works, and it costs very little (basically, the only costs are a $5/month Linode VM and a $5/year domain). When you're fed up with an old project and want to move away from maintaining it as soon as possible, building something fast is far more important than building a perfect solution.
I had a lot of fun playing with n8n and will definitely use it for more things in the future (e.g., a few weeks ago, I migrated some old workflows from IFTTT to n8n). If I were to start this project again today, I would skip the part of building a custom n8n Docker image with my Python packages because now the "Code" node supports running Python scripts (and the available modules include requests and Click, among other packages).
I started using n8n when it was still a mostly one-man project, not a VC-backed company as it is now. I greatly respect Jan - the creator of n8n - for being so proactive, and I hope with the additional funding, this project will flourish. But when projects take external funding, they have investors that expect a return on their investment. And that often ends badly for open-source projects. So, while I'm still a very satisfied user of n8n, if I were to choose a tool today, I would carefully reevaluate available options. ↩︎
Why did I choose Telegram over other messaging applications? Because I was already using Telegram for chatting with friends. You can, of course, use another tool like Discord or Slack. n8n has plenty of integrations with other messaging apps. ↩︎